
Recently, I ran into some shading issues using a world space normal map on my billboards. When instanced meshes have different rotations, it seems Unreal Engine can't keep the normals consistent. Since Unreal's imposter baker creates world space normal maps, I needed to find a way to convert them to tangent space.

 | |
| Billboards with world space normals. |
 |
| Billboards with tangent space normals. |
To fix this issue, I converted my world space normal map to tangent space with xNormal. Here are the steps that I took.
- First, there are two things that you need. One is the source mesh, and the other is the world space normal map baked from that mesh.

- Rotate the mesh to match xNormal's coordinates. I don't yet know a great way to figure this out, so I just guessed until I got it working. For me using 3ds Max, I rotated the mesh 90° in X and 180° in Z. Make sure to reset XForm before rotating. If there are already transforms on the mesh, this will interfere with how xNormal interprets the orientation.

- Export the mesh as an obj file. These are the settings that worked for me.

- Go to the tools section in xNormal, open the object/tangent space converter, enter the settings for your mesh, and generate. In this case, Xnormal is actually converting from object space to tangent space. So long as you didn't move your mesh from it's original pivot point, it should work fine with world space normals.

- Check the output tangent space map. It should look something like this. This is close, but you will still need to edit some of the channels so it's compatible with Unreal.

- Look at the individual RGB channels of the map in an image editor, such as Photoshop. If you imagine a light shining from the edges of the image, you can get a sense of how the channels should look. In this map, red is coming from the left, green from the bottom, and blue from the back. For Unreal Engine, you want the red from the right, green from the bottom, and blue from the front.

These are the original axis directions in the baked tangent space map. 
These are the directions needed for Unreal Engine. In this case, the red and blue channel are inverted. - Invert the red and blue channels of the texture. I used Substance Designer for this. Using an RGBA split, I inverted the red and blue channels and then re-merged them. After that, I used the alpha channel to make a mask for the background areas. To expand the edges of it a bit, I used edge detect. After that, I filled the area with the default normal map color. This should prevent any artifacts on lower MIP maps in the texture.


The final normal map. - Finally, import the normal map into Unreal. There are two options for how you can import it. One is importing it like a standard normal map without changing any settings. For the other, you can import it as a linear color texture and then adjust it in the material. I opted for the linear color because it seems to take slightly less space.

- If you want to use a linear color map, change all settings to default and uncheck sRGB. Whenever you use it in a material, make sure to add a constant bias scale node. Set the bias to -.5 and scale to 2.
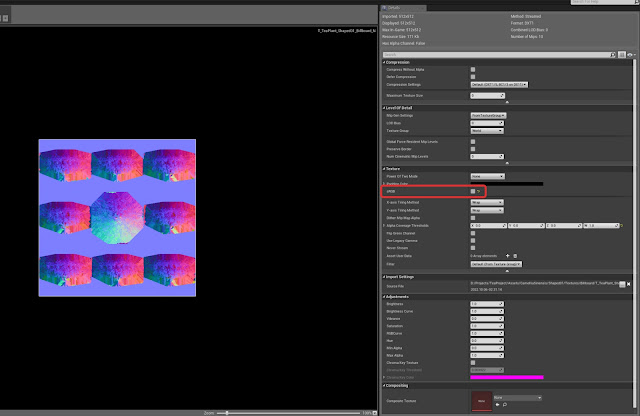
Linear color texture settings. 
Make sure to add a constant bias scale node anytime you use a linear color normal map.


That's it! You should now have a functional tangent space normal map.


