Pages

Saturday, July 6, 2024

Turtle Textures

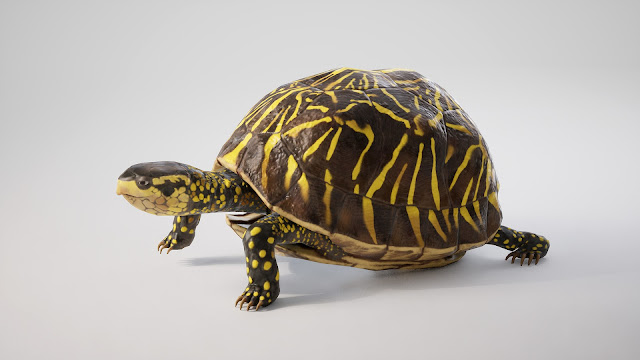
    Here's some progress on the turtle textures.


    I think they are at a decent point for now. I may try mirroring some of the UVs though to get some extra texture resolution. It depends on how noticeable the mirroring ends up being. Aside from that, I also set up an AI character for the turtle and added an animation where it goes in its shell when you walk close to it.


    Next I'm going make a footprint effect for the turtle and add wind to the rest of the plants that don't have it yet.

Saturday, June 22, 2024

Turtle Low Poly

    I think the low poly version of the turtle is about ready now. It currently has 5182 tris, which should be reasonable for its intended screen size. Aside from that, I also set up UVs and baked normals from the high poly version. This low poly version ended up being much easier to UV than the high poly version. The UV editor ran pretty slow when I was originally unwrapping the high poly, and it was also difficult to mark seams just because there were so many edges. 


   Next I'm going to start on textures and then project the skin weights to this new low poly version. I already tested it earlier, and it's pretty straight forward.


Tuesday, June 11, 2024

Turtle Animation Test

     I created a quick walk cycle to test out the rig.


    Overall the rig is fairly easy to animate with, so I'm going to move on to texturing next. I'm having a bit of trouble UVing this mesh due to its density. To make that easier, I'm going to try retopologizing so it has a lower polycount. I haven't used Maya's retopology tools too much before, but I'm finding them to be pretty intuitive and fun to use.


Starting to retopologize the shell.

        We'll see how this goes. Worst case scenario, I can set up the UVs in ZBrush instead. I'm hoping the retopolgy works out though. It should also help with performance since skeletal meshes can't use Nanite.

Sunday, February 4, 2024

Finding a Perpendicular Vector Using Dot Product

     While setting up a rig for the turtle, I decided to add IK/FK snapping functionality to help with animation. To set this up, I needed a way to calculate the pole vector for the legs when snapping IK to FK. I found this great tutorial by Greg Hendrix explaining how to do that. https://vimeo.com/240328348

    As I incorporated this into my rig though, I was confused on how he found the vector that's perpendicular to the middle joint. After experimenting with it, I found a different method that makes sense to me, so I want to record some notes on how it works.

     Basically, I needed this vector to help place the pole vector. With this vector, I could subtract it from the mid joint to get a new vector that's perpendicular to the IK line. This new vector could then be scaled depending on how far I want the pole vector to be from the mid joint.

    The first step was to find the length along the IK line up to the perpendicular point. I found this through calculating the dot product of the rootToMid line and ikLine. The important thing that I realized is that ikLine needs to be normalized for this to work. If I didn't normalize, it returned a length that was scaled by the ikLine vector. By normalizing ikLine, it gave the exact distance to the perpendicular point.

    In python, I wrote this out as follows.

 ikLineMidLength = rootToMid * ikLine.normal()

    After getting the length, I divided it by the ikLine length to get a scale value. 

ikLineScale = ikLineMidLength / ikLine.length()

    Finally, I multiplied the ikLine vector by the scale value to get a new vector at the perpendicular point.

ikMidVector = (ikLine * ikLineScale) + rootJntVector

    Here's the Python code that I used to find the perpendicular vector and place a locator at it's coordinates. After finding that vector, I also needed to offset it by the root vector. The initial vector subtractions caused everything to be relative to the origin, so it needed to be moved back to match the original joint locations.

import maya.cmds as cmds
import maya.OpenMaya as om

def addLocator(inputVector, inputName):
    cmds.spaceLocator( p=(inputVector.x, inputVector.y, inputVector.z), n=inputName )
    
# Joint Positions
rootJointPos = cmds.xform('rootJoint', q=True, ws=True, t=True)
midJointPos = cmds.xform('midJoint', q=True, ws=True, t=True)
endJointPos = cmds.xform('endJoint', q=True, ws=True, t=True)

# Joint Vectors
rootJntVector = om.MVector(rootJointPos[0], rootJointPos[1], rootJointPos[2])
midJntVector = om.MVector(midJointPos[0], midJointPos[1], midJointPos[2])
endJntVector = om.MVector(endJointPos[0], endJointPos[1], endJointPos[2])

# Distance Vectors
ikLine = endJntVector - rootJntVector
rootToMid = midJntVector - rootJntVector

ikLineMidLength = rootToMid * ikLine.normal() # Find the distance to the point on ikLine that is perpendicular to the midJoint.
ikLineScale = ikLineMidLength / ikLine.length() # Find the ratio of the perpendicular distance to the length of the ikLine.
ikMidVector = (ikLine * ikLineScale) + rootJntVector # Scale the ikLine by the ratio to find the vector at the perpendicular distance.

# Place Locator at Perpendicular Vector
addLocator(ikMidVector, "ikMidVector")


    Initially I had some trouble figuring this out. In particular, I was stuck on the mid length dot product until I realized that the IK Line needed to be normalized. Hopefully I can go back to this post if I ever forget how this works.

    Aside from that, I've also started on a script where you can provide 3 input joints and automatically place a new pole vector based on them. I'll make another post about that when it's ready.


Wednesday, November 22, 2023

Mushrooms

    I think the mushrooms are about ready now. Basically, I made 3 different types and mapped them all to one set of 512x512 textures. One limitation that I realized later on is that it's difficult to get per-mushroom texture variations when all 3 of them are on one texture sheet. Since they're fairly small, I'll leave them as-is for now. I may look into adding more variations later though.


    Now it's time to start on the turtle. I haven't modeled any animals before, so I think this will be a great new challenge. Rigging it will also be fun, and it should add some nice extra life and movement to the scene.


Monday, October 9, 2023

Turtle Stone Sculpture

     I think the stone sculpture is about ready. While I'm considering more material edits, I'll move on to the mushrooms next so I can continue populating the scene.


     There are a few different brushes recommended in the foliage class that I tried out to add a stone look to the sculpture. One of them is Trim Smooth Border. It's a great brush for adding edge damage because it can quickly flatten out any areas that you paint on.


     I also tried out a variety of rock brushes to add cracks and overall texture.

        Dannie Carlone Brushes

        Orb Brush Pack

        Paul Tosca Brushes

    Aside from the sculpt, I experimented with using a material mask to texture the sculpture. In the mask, I painted black for normal stone, red for darker stone, and green for moss. One plus of this method is that the textures are tiled, so it's easier to get a high resolution as opposed to a 0-1 map. I could also reuse this material for other stone assets. As mentioned earlier, I still would like to revisit this later to get more variation, but I think it will work for now.


    Finally, one more thing that I experimented with is Nanite. It allowed me to go fairly high poly with the mesh without using too much memory. In this case, I opted to go to around 40,000 triangles with a baked normal map. All the content for the asset took up about 4.4 MB. I also imported a 150,000 triangle mesh which took up 9.6 MB. Since I felt like the former looked about as good as the higher poly one, I went with that.

Nanite visualization.

    Additionally, I used Nanite displacement to add some height to the mossy areas. It took me a little while to figure out. I eventually found that I needed to edit the displacement settings in the details panel. To make sure the moss only pushed the mesh out and didn't go inwards, I set the center to 0.


    Next it's time for the mushrooms. They should be some more good sculpting practice, and hopefully they'll add some interesting variation to the ground.


Wednesday, August 30, 2023

Turtle Sculpt Progress

     I think the base sculpt is about ready now. Next I'm going to modify this to create a stone sculpture of the turtle.


    One technique that helped out was stamping shell alphas with the Standard brush and DragRect. To do this, I made some simple outlines from top and bottom, loaded them as alphas, and then dragged them onto the shell. Once the basic outlines were stamped, I used Trim Dynamic and Pinch to further refine the shapes.


    Another thing that helped was setting the focal shift to -100. Typically the alpha had a soft falloff to it when I stamped, so lowering the focal shift allowed me to stamp it with full intensity.


    Overall, I think the turtle is off to a decent start. Once I'm finished with the stone sculpture, I'm going to revisit the original and make a live version.