Pages

Monday, February 27, 2023

Week 5: Tree Canopy

    This week I finished up the tree canopy. To start, I modeled some different branch variations in Maya.


    Basically, I created some reusable branch pieces to build the different variations. Those pieces are in the top row above with the final variations along the bottom.


    After creating the branches, I brought them along with the leaf meshes into SpeedTree. To attach the leaves to the branches, I created target nodes using the click place tool in freehand mode. Each target automatically finds the closest point on the branch and then adds a leaf.


    With the leaves placed, I then arranged all the branches to fit within a square plane and rendered the atlas.


    Next I mapped the atlas to some cards in the main tree and added the canopy.


    Finally, I brought the tree into the Unreal project. I also painted the ground plant that I created earlier along the base.


    Overall I think the tree is adding a lot to the scene, and I'm glad I finally have the canopy in. I am wondering if the canopy is a little too thin right now. I might want to increase the atlas density in the future, but I'm going to think it over a bit first. Next I'm going to create some ferns. They should add some nice variety to the scene, so I'm looking forward to starting on them!


Monday, February 20, 2023

Week 4: Tree Canopy

 This will be a quick post for this week. I got a bit slowed down due to having a cold. Mainly I started on the leaf atlas for the canopy. To create it, I sculpted some oak leaves similar to how I approached the previous plant. After that, I painted some textures in Substance Painter. Next, I'm going to make a dead variation of the leaves, start on the branches, and then create some canopy textures.


Monday, February 13, 2023

Week 3: Bark and Tree Trunk

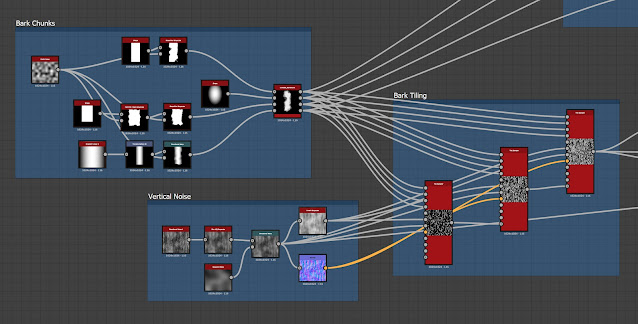
    This week I started on the bark and tree trunk. For the bark, I used Substance Designer to mix some small chunks and gradually build up a layered bark effect. I think it's kind of getting there, but I feel like the crevices between the bark chunks may need more definition.


    To create the initial layers, I made 4 different bark chunk shapes and arranged them on 3 different tile samplers which I combined together. After making that initial height map, I varied up the shapes with warp and slope blur nodes.


    After making the bark, I applied it to my tree trunk in SpeedTree. The branch shapes will most likely need more edits, but I will probably get more ideas on what to change once I add the canopy.


    Other than that, I also made Spanish moss and added it to some of the branches. I had a lot of trouble placing them, so I'm still looking for a good way to hang them quickly and believably. To generate the textures, I learned how to use FiberMesh in ZBrush. Once I had the high poly, I simply baked them onto a low poly plane and used the maps to generate a base color in Substance Designer. Eventually I want to pack a few more variations into the atlas. For now though, I just kept it to 4 pieces so I could test them out in SpeedTree.


FiberMesh Process

Final High Poly

Final Textures

That's all for now! Next I'm going to start on the canopy and rework the trunk, bark, and Spanish moss as necessary.


Monday, February 6, 2023

Week 2: First Plant

 This week I created materials and meshes for my first plant type. 


One new technique that I used is generating the materials in Substance Painter. Since I had height information from the ZBrush sculpt, I could create a lot of variation with fill layers and generators. As an example, I used the "Dust Dirty" smart mask to make the leaf veins yellow.


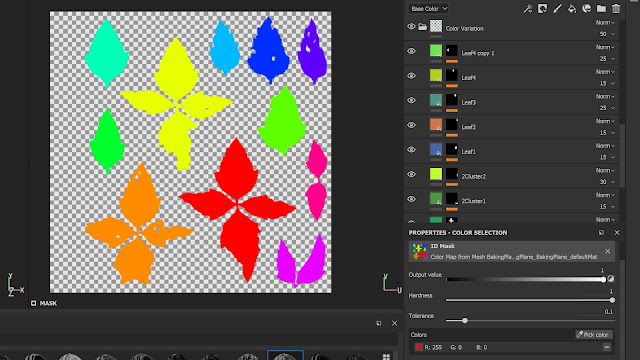
Since the ZBrush leaves had different Polygroups, I also baked an ID mask. With this mask, I created a different color overlay layer for each leaf. This made it so some leaves could be a little more yellow and others more blue-green. This subtle variation adds some more contrast to the plant so the leaves don't feel like they're all one flat color.


Example of some of the different layers used.

Overall I think it's off to a decent start. Next I'm going to start on a tree. It should be a great way to better familiarize myself with SpeedTree!


Monday, January 30, 2023

Southeastern Forest Scene Week 1

 Over the next couple of months, I'm taking a foliage class. I'll post my weekly progress here. This scene will be a southeastern conifer forest based on some nearby parks that I've visited.

For this first week, I gathered reference, created some sketches, and started on the leaf atlas. It's been a while since I last used ZBrush, so this has been a great refresher. 

Other than that, it's also my first time using PureRef to organize reference photos. So far I really like using it. Previously, I usually put reference photos together in Photoshop, but this is more flexible and easier to use. Compared to Photoshop, the main thing that I like is how you can keep adding full resolution images and increase the canvas area without performance getting affected.


For my sketch, I also experimented with a new technique where I make separate layers for local color and lighting. I enjoyed working this way because it somewhat mimics 3D rendering. I definitely want to try it again on future sketches.

Additionally, I practiced perspective with this. The main thing I focused on was approximating the cone of vision to make sure nothing gets distorted in the shot. I found this helpful page explaining cone of vision: https://courses.byui.edu/art110_new/art110/week02/cone_of_vision.html

Following the video, I made a circle bigger than the image and then made sure it was about 60% as wide as the distance between the vanishing points. This should give a standard 60 degree viewing angle.


To create the leaf atlas, I sculpted one leaf and then duplicated it a few times. With the deformation, move, and clipping tools, I bent the overall shapes and added some damage to vary them up. The cylinder on the left is a placeholder for a tiling stem texture.

That's it for the first week! The next step is baking this atlas and creating materials in Substance Painter.


Sunday, October 16, 2022

How to Convert World Space Normals to Tangent Space

    Recently, I ran into some shading issues using a world space normal map on my billboards. When instanced meshes have different rotations, it seems Unreal Engine can't keep the normals consistent. Since Unreal's imposter baker creates world space normal maps, I needed to find a way to convert them to tangent space.


Billboards with world space normals.

Billboards with tangent space normals.


    To fix this issue, I converted my world space normal map to tangent space with xNormal. Here are the steps that I took.


  1. First, there are two things that you need. One is the source mesh, and the other is the world space normal map baked from that mesh.


  2. Rotate the mesh to match xNormal's coordinates. I don't yet know a great way to figure this out, so I just guessed until I got it working. For me using 3ds Max, I rotated the mesh 90° in X and 180° in Z. Make sure to reset XForm before rotating. If there are already transforms on the mesh, this will interfere with how xNormal interprets the orientation.


  3. Export the mesh as an obj file. These are the settings that worked for me.


  4. Go to the tools section in xNormal, open the object/tangent space converter, enter the settings for your mesh, and generate. In this case, Xnormal is actually converting from object space to tangent space. So long as you didn't move your mesh from it's original pivot point, it should work fine with world space normals.


  5. Check the output tangent space map. It should look something like this. This is close, but you will still need to edit some of the channels so it's compatible with Unreal.


  6. Look at the individual RGB channels of the map in an image editor, such as Photoshop. If you imagine a light shining from the edges of the image, you can get a sense of how the channels should look. In this map, red is coming from the left, green from the bottom, and blue from the back. For Unreal Engine, you want the red from the right, green from the bottom, and blue from the front.

    These are the original axis directions in the baked tangent space map.

    These are the directions needed for Unreal Engine. In this case, the red and blue channel are inverted.


  7. Invert the red and blue channels of the texture. I used Substance Designer for this. Using an RGBA split, I inverted the red and blue channels and then re-merged them. After that, I used the alpha channel to make a mask for the background areas. To expand the edges of it a bit, I used edge detect. After that, I filled the area with the default normal map color. This should prevent any artifacts on lower MIP maps in the texture.


    The final normal map.


  8. Finally, import the normal map into Unreal. There are two options for how you can import it. One is importing it like a standard normal map without changing any settings. For the other, you can import it as a linear color texture and then adjust it in the material. I opted for the linear color because it seems to take slightly less space.


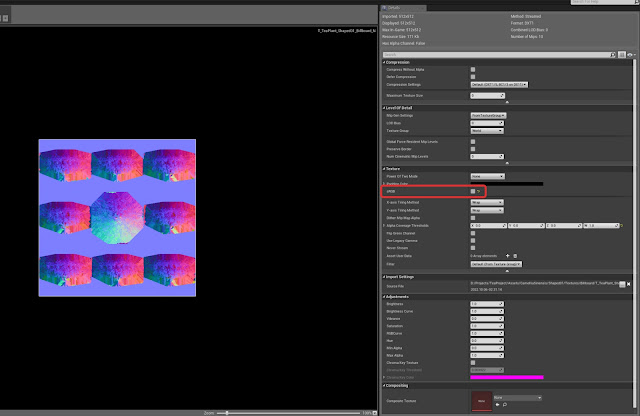
  9. If you want to use a linear color map, change all settings to default and uncheck sRGB. Whenever you use it in a material, make sure to add a constant bias scale node. Set the bias to -.5 and scale to 2.

    Linear color texture settings.


    Make sure to add a constant bias scale node anytime you use a linear color normal map.

    That's it! You should now have a functional tangent space normal map.